Awards Recognize Excellence in Climate-Friendly Building Design
April 4, 2023
ZEBx Annual Survey: Win one of three $200 prizes!
April 12, 2023

Apr 2023
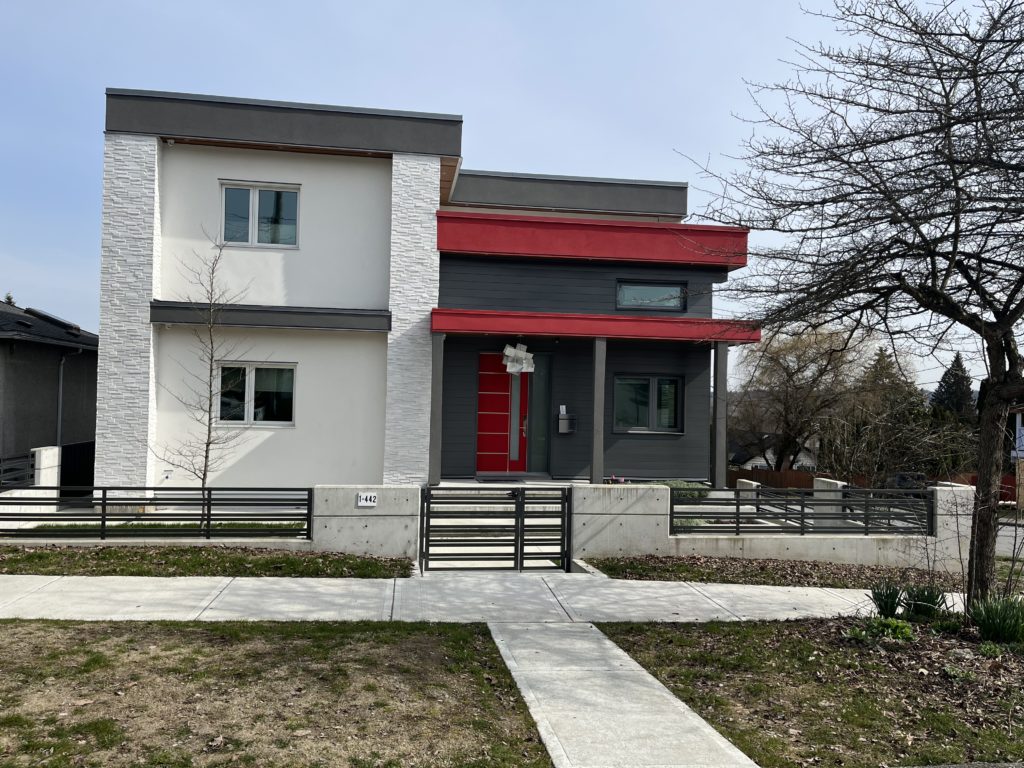
Written by: Rahul Chander (owner/builder)
Why Step 5?
In 2018, I learned that Step 5 will be mandatory beginning in 2032 for all new homes in BC. This information, and the incentives from the City of New Westminster for early adopters, helped me decide to build my new home to meet Step 5.
Why go ahead with it now rather than wait until 2032?
The answer for me was comfort and durability. When designed, modelled and constructed correctly, a house conforming to Step 5 provides a comfortable, draft-free living space, with lower energy consumption and longer service life. This is achieved by better air-sealing, high R-value windows, continuous insulation coverage, and strategic placement of vents to get rid of cold drafts or significant temperature differences – all of which automatically keep the house warmer in the winter and cooler in the summer.
About My House
| Area | 260 m2 (2,800 ft2) (including secondary suite) |
| Bedrooms/Baths | 6/5 |
| Airtightness | 0.61 (ACH at 50 Pa) |
| Building Envelope Component | Description |
| Air Barrier | -self-adhered membrane on roof sheathing -spray-foam in joist boxes -taped joints of plywood wall sheathing -concrete for foundation and slab |
| Roof | -flat roof trusses @ 406 mm (16”) OC w/ 5.63 m2·K/W (R-32) batt insulation -two layers totalling 102 mm (4”) of polyiso exterior insulation -RSI 9.5 m2·K/W (R-54) nominal thermal resistance |
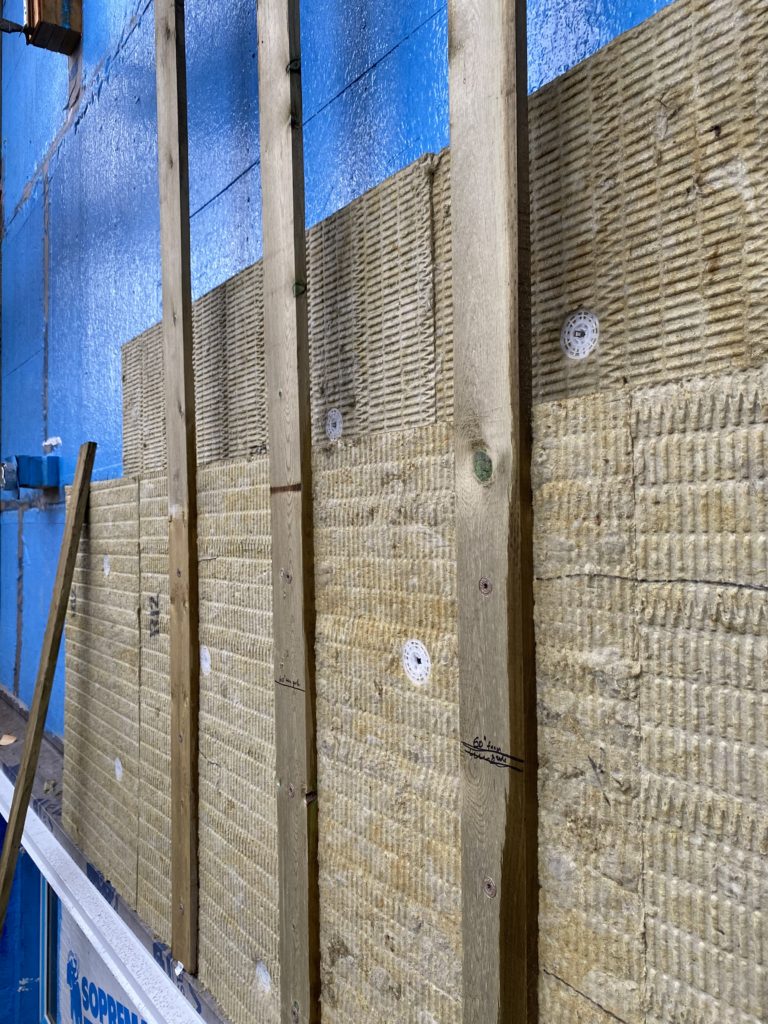
| Exterior Walls | -50 mm x 152 mm (2” x 6”) @ 406 mm OC with 3.9 m2·K/W (R-22) batt insulation -two layers totalling 127 mm (5”) of mineral wool exterior insulation -RSI 7.4 m2·K/W (R-42) nominal thermal resistance |
| Foundation Walls | -insulated concrete forms with 203 mm (8”) concrete walls and 83mm (3 ¼”) expanded polystyrene (EPS) insulation for the inner and outer layers -additional 25 mm (1”) extruded polystyrene (XPS) outer layer -RSI 5.5 m2·K/W (R-31) nominal thermal resistance |
| Slab-on-grade | -102 mm (4”) concrete slab -two layers of EPS insulation totalling 152 mm -RSI 4.2 m2·K/W (R-24) nominal thermal resistance |
| Windows | -VinylTek Boreal 6000 series -triple-glazed, argon-filled with PVC frame and Endur spacer -multi-point locking -U-value from 0.85 to 1.02 W/m2·K -solar heat gain coefficient (SHGC) from 0.16 to 0.18 -low-emissivity coating LoE366/LoE180/LoEi89 |
| Doors (without glazing) | -fiberglass doors with polyurethane foam -RSI 0.9 m2·K/W (R-5) nominal thermal resistance -multi-point locking |
| Folding Patio Doors (with glazing) | -Eclipse triple-glazed fiberglass doors -U-value of 1.34 W/m2·K -SHGC value of 0.37 -multi-point locking |
| Mechanical Component | Description |
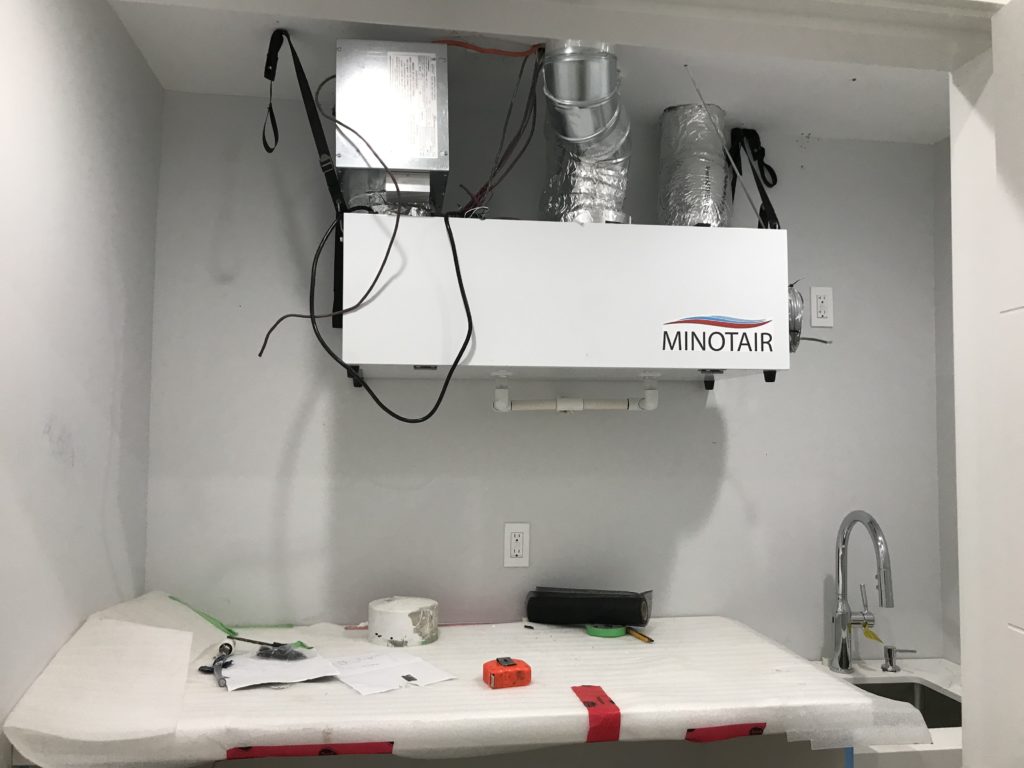
| Ventilation System | -Minotair Pentacare V12 HRV for the main house (sensible heat recovery efficiency of 116%i) -Napoleon NERV2400T ERV for the secondary suite (sensible heat recovery efficiency of 84% ii) |
| Recirculation Fan | -349 L/s (740 cfm) Vivosun variable-speed in-line duct fan (main house) |
| Primary Space Heating | -Minotair Pentacare V12 HRV (built-in heat pump) with a heating capacity of 1,650 W to 2,550 W (5,630 to 8,700 BTU/hr) and a heating seasonal performance factor of 10.4 -Stelpro duct heater with a heating capacity of 5 kW (17,060 BTU/hr) -Wexstar infra-red heater WS-8WREF with a heating capacity of 800 Wiii for the secondary suite |
| Primary Cooling | -Minotair Pentacare V12 HRV (built-in heat pump) with a cooling capacity of 3,282 W to 3,370 W (1 ton) and a seasonal energy efficiency ratio of 14.1 |
| Auxiliary Heating | -3 electric fireplaces with a total capacity of 4.5kW (15,354 Btu/hr) for the main house |
| Water Heating | -Sanden SANCO2 G4 heat pump hot water system with a heating capacity of 4.5kWiv -314 L (83 US gal) storage tank |
| Cooking Appliance | -gas stove (main house) -electric stove (secondary suite) |
| Kitchen Ventilation | -189 L/s (400 cfm) remote blower interlocked with a 189 L/s make-up air fan and a 1 kW (3,412 Btu/hr) make-up air heater (main house) -118 L/s (250 cfm) recirculation hood fan with charcoal filter (secondary suite) |
Tip #1: Choose your building assembly wisely and install it carefully
My building assembly consists of a split-insulation roof and wall assembly. Air barrier materials for vertical surfaces are vapour-open and for horizontal surfaces, they are vapour-closed. Similarly, exterior insulation for above-grade walls is vapour-open while for roofs, below-grade walls, and slabs-on-grade, it is vapour-closed. Vapour-open materials for above-grade vertical surfaces increase drying potential. Vapour-closed materials for horizontal and below-grade vertical surfaces prevent standing water or soil moisture from penetrating the building.
I carefully supervised exterior insulation installation to ensure the insulation layers were properly staggered. Staggering layers makes it difficult for heat to escape through insulation joints and seams and creates a more continuous insulation coverage that is difficult to achieve using only a single layer. I stuffed loose scrap insulation pieces into any gaps in the outermost layer of insulation at seams, corners and windows.
My non-vented roof assembly did not require a typical polyethylene vapour barrier in the ceiling. I therefore ended up with a conditioned attic space within flat-roof trusses, which greatly simplified installation of services. For example, sprinkler pipes did not need insulation boxes, and pot lights, cables, and plumbing could be installed without requiring poly-boots, air sealing etc.
Insulated concrete forms (ICF) with no metal ties or fasteners into concrete for the below-grade walls offered the highest quality of continuous insulation. The plastic studs within the ICFs hold anything from gypsum wallboard and cabinets to heavy cladding like stucco.
Tip #2: Understand your energy model
New Westminster requires a HOT2000 Full House Report (proposed and as-built versions) as part of the permit application and final occupancy request. I leveraged a lot of important information in the HOT2000 energy modelling report as a builder and used it to inform decisions regarding architectural design and mechanical equipment selection.
During design, I paid close attention to three main components of the report:
- Building Parameters Summary – Heat Loss
- House Volume
- Design Space Heating and Cooling Loads
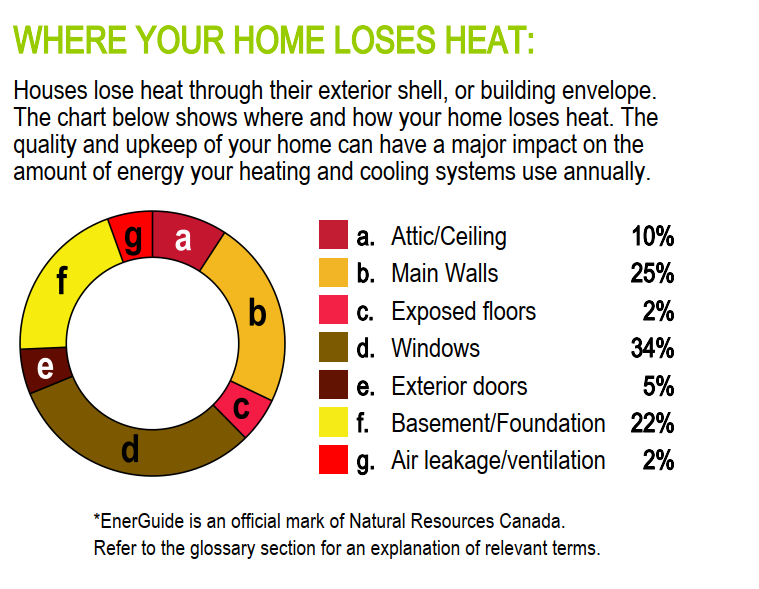
Building Parameters Summary – Heat Loss information in the energy modelling report gave me valuable insight into heat loss from each building element, including walls, roofs, and windows. For example, our original design had over 50% of heat loss from windows and doors, which we brought down to 40% by following Tip#3: Optimize Doors, Windows and Shading (see below).
House Volume is the total volume of all conditioned spaces and is used to determine the air changes per hour (ACH). Due to the complexity of interpreting architectural plans, it is possible for an energy modeller to make an error in calculating the ACH. If the House Volume is higher than the correct value, then air tightness is falsely high, and if lower, then airtightness is falsely low. It also has an effect on all HOT2000 parameters that depend on the ACH value (e.g. TEDI and PTL). Ideally, the municipality should double-check this number as it is very similar to floor space ratio verification.
Heating and Cooling Loads dictate the minimum heating and cooling capacities (measured in watts) of the mechanical equipment that should be installed in the house to meet winter and summer heating and cooling needs. For my location, the minimum heating capacity was calculated using an outdoor temperature of -4.4°C and an indoor temperature of 22°C. Because the heating load design criteria in HOT2000 does not account for the coldest days, I installed twice the minimum heating capacity. I also added backup electric fireplaces for extra capacity if winter temperatures reach new extremes. I did not install a dedicated cooling system and decided to rely on the Minotair HRV’s built-in heat pump for cooling.
Tip #3: Optimize Doors, Windows and Shading
Every door and window is a source of air leakage and heat transfer. When researching materials for my project in 2019, the best-performing doors and windows that I could find had a thermal performance of RSI 1.1 m2·K/W (R-6) and RSI 1.4 m2·K/W (R-8), respectively. Compared to the thermal performance of a basic 3.9 m2·K/W (R-22) wall, a disproportionately large amount of energy escapes from doors and windows. It was obvious that I needed to reduce the number of doors and windows.
My wife took up the challenge and picked window locations and sizes that added value to our home. In the end, this exercise resulted in a window-to-wall ratio of just 12% and brought heat loss (through windows and doors) down to 40% (from 50%).
For windows and doors facing west and south, I added wood-framed shading to reduce solar heat gain during the summer. To install shading as close to windows as possible, overhang supports were not attached to floor-level rim joists but were installed a bit lower. Optimizing doors, windows and shading greatly influenced the heating and cooling loads.
Tip #4: Avoid Direct-Exhaust Ventilation
Typically, in Step 3 (and lower) houses, dedicated bathroom fans provide direct-exhaust ventilation. These fans are often rated at 38 – 57 L/s (80 – 120 cfm) and can run between 15 minutes and an hour per use. A direct-exhaust system takes conditioned air from the bathroom and dumps it outside using a dedicated vent. This results in significant loss of conditioned air, which needs energy for conditioning.
Furthermore, the loss of air from inside the house automatically brings fresh unconditioned air inside the house, which then needs to be conditioned by the heating/cooling system. However, bringing it into the house through a heat recovery ventilator (HRV) reduces the amount of energy spent on conditioning the make-up air.
I eliminated all bathroom fans and used the HRV for exhaust ventilation instead. Newer HRVs have a special low-voltage switch that can be installed in bathrooms. When pressed, the HRV goes into “boost mode” to remove stale air and bring in fresh air at a faster rate. Each bathroom needs a return duct to take the stale air back to the HRV. This allows for energy exchange between the outgoing stale air and the incoming fresh air. In my house, I have five exhaust ports with a boost mode capacity of 118 L/s (250 cfm), so each port will exhaust roughly 24 L/s (50 cfm). This takes a bit longer to clear the air in the bathrooms compared to a dedicated bathroom fan, but it saves energy and only one outdoor vent is needed.

To search for decent HRVs, I referred to the HVI websitev , which has a table of all HVI-certified equipment. To simplify the selection process, I simply sorted the table by efficiency and quickly found the top performers.
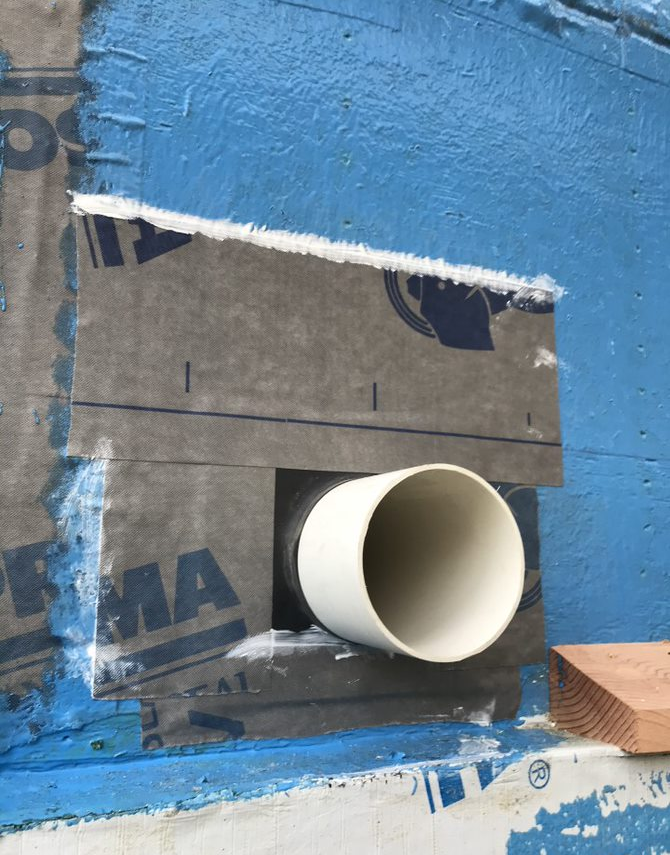
Tip #5: Seal All Penetrations and Edges
A house has many penetrations through its air barrier. To seal these, I used a method specific to the geometry of the penetration, while taking into consideration the water-shedding layers.
I handled rounded penetrations such as HVAC, plumbing and low-voltage cables using an ethylene propylene diene monomer (EPDM) sleeve. A video showing this process is herevi.
I handled structural elements such as beams, trusses and joists that penetrated the air barrier using a combination of foam, sealant and self-adhering sheet membranes tailored to the size of the gap.
I sealed the outside and inside corners with self-adhering sheet membranes. These included where concrete slab edges meet ICF walls, where ICF seams meet slab edges, where roof sheathing meets roof trusses, where windows meet rough openings, and where wood framing meets foundation walls.
Final Thoughts
It has now been more than a year since I moved into my home and I’ve gained a few insights as I reflect on the experience of constructing this house. I found that the HRV has a profound effect on fresh air and indoor humidity. If the ventilation rate is too high, then the indoor relative humidity (RH) increases in the summer (peaked at RH 55% at 25°C), and in winter, indoor humidity decreases (dropped to RH 22% at 22°C). Higher ventilation rates also lead to higher energy use as there is a greater loss of conditioned air.
Another consideration is indoor air circulation. The higher the air circulation, the more consistent the temperature, humidity, and CO2-levels are from room to room. During nights and cloudy days, all my rooms stay within 0.5°C and 4% RH. On sunny days, rooms with large windows and direct sun exposure tend to get warmer temporarily but cool off once the sun goes away. One drawback I discovered was that in the summer, cooking tends to heat up the house quite a bit. The heat generated from cooking is somewhat slow to dissipate through the well-insulated house.
As of 2023, I do not have sufficient data to make a claim for energy savings. I will monitor the energy bills over the next few years before reaching any conclusion. Building an energy-efficient house for operational savings at today’s energy prices did not justify the capital cost of construction. However, because of municipal incentives, I obtained extra building height for a unique corner lot, architectural appeal. This came with greater access to scenic views, increased indoor ceiling heights, and raised the level for a secondary suite. These have increased the resale value of my house. The energy savings, building green, and indoor comfort are added bonuses. Once Step 5 is mandatory for all new construction, my house will not be obsolete and will remain future-proof.
Lastly, I am grateful to ZEBx for providing financial support which helped during the construction of my home.
All photos taken by Rahul Chander (copyright 2023).
If you require further information, please contact Rahul at info @ cmanda.ca